Tuesday, November 10, 2015

Strike through SharePoint 2013 document item based on its status using JS Link

We have a requirement to strike through SharePoint 2013 document item based on its status "Obsolete". If the obsolete is "yes", the column named "Part Number" should be strike through and highlighted as red as in the below screenshot.


The easiest way to implement this is to use SharePoint 2013 new feature JS Link. There are several good JS Link references to highlight a SharePoint list row and color list item with different color. You could refer my previous blog to configure the JS Link. If you add the following javascript as JS Link named Obsolete.js to the display web part, you will get the desired result.

(function () { 

    // Create object that have the context information about the field that we want to change it's output render  
    var priorityFiledContext = {}; 
    priorityFiledContext.Templates = {}; 
    priorityFiledContext.Templates.Fields = { 
        // Apply the new rendering for Obsolate field on List View 
        "Part_x0020_Number": { "View": obsolateFiledTemplate } 
    }; 

    SPClientTemplates.TemplateManager.RegisterTemplateOverrides(priorityFiledContext); 

})(); 

// This function provides the rendering logic for list view 
function obsolateFiledTemplate(ctx) { 

    var title = ctx.CurrentItem[ctx.CurrentFieldSchema.Name]; 

var obsolate = ctx.CurrentItem.Obsolate;
console.log(obsolate);

      // Return html element with appropriate color based on priority value 
if (obsolate == "Yes")
{
return "<span style='color :#f00'>" + "<del>" + title + "</del>" + "</span>"; 
}
else{
return "<span style='color :#000000'>" + title + "</span>"; 
}


The following script will highlight the item to red when obsolete value is "Yes".


(function () {
    var overrideCtx = {};
    overrideCtx.Templates = {};
    overrideCtx.OnPostRender = {
        HighlightRowOverride
    };
    SPClientTemplates.TemplateManager.RegisterTemplateOverrides(overrideCtx);
})();

function HighlightRowOverride(ctx) {

for (var i=0; i< ctx.ListData.Row.length; ++i){

var lid = GenerateIIDFromListItem(ctx, listItem);
var row = document.getElementById(iid);

if (listItem.Obsolate == "Yes") {
row.style.backgroundColor = "rgba(255, 0, 0, 0.5)";
}
}

ctx.skipNextAnimation = true;

}

You will see this implementation is very flexible and we could use this for many other different implementations.

If you need to strike through the Document Name field, you would look at the field using view source. Here is the field definition.

{"Name": LinkFilename",
"FieldType": "Computed",
"RealFieldName": "FileLeafRef",
"DisplayName": "Name",
"ID": "5cc6dc79-3710-4374-b433-61cb4a686c12",
"ClassInfo": "Menu",
"Type": "Computed",
"Filterable": "FALSE",
"listItemMenu": "TRUE",
"CalloutMenu": "TRUE",
"AllowGridEditing": "TRUE"}


You can change the two line of the javascript.

    priorityFiledContext.Templates.Fields = {
        "LinkFilename": { "View": obsolateFiledTemplate }
    };

 var title = ctx.CurrentItem.FileLeafRef;

Please note that you could use powershell or server side API to automatically set the JSLink to the webpart if there are many lists or libraries you need to configure.

Friday, November 6, 2015

Use JSLink to auto populate the SharePoint item field without server side code like custom field

Recently we have a requirement to automatically generate a unique number string for one field called “Part Number” for many SharePoint Document libraries. This unique number string would need to follow some business logic like below.


There are several ways we could implement this. One of the old school method is to implement the field as custom field with business logic to generate unique number string. However, we had several custom fields on SharePoint that caused SharePoint upgrade complexity. In this blog, we will use a new client side implementation JSLink that will not have any server side component. In this way, the solution will be potable and the upgrade will be extremely simple.

The first step is to write a JSLink script named PartNum.js to replace the out of box “Part Number” text field behavior. You would need to find out the field internal name using the way published here. The internal field name for “Part Number” is “Part_x0020_Number“ in our case.  The script will look like below. You would need to update the guid() function with real business logic.

(function () {
    var overrideCtx = {};
    overrideCtx.Templates = {};
    overrideCtx.Templates.Fields = {
        'Part_x0020_Number': { 'NewForm': renderTitle, 'EditForm': renderTitle }
    };
    SPClientTemplates.TemplateManager.RegisterTemplateOverrides(overrideCtx);
})();

function renderTitle(ctx) {

var formCtx = SPClientTemplates.Utility.GetFormContextForCurrentField(ctx);

RegisterCallBacks(formCtx);

        var fieldVal = ctx.CurrentFieldValue ? ctx.CurrentFieldValue.toString() : null;
       
        if(fieldVal) { 
var html = '<div>';
html += '<input id="uniquePartNum" type="text" value=' + fieldVal + '>';
html += '</input>';
html += '</div>';
return html;
}
else{
var newGUID = guid();
var html = '<div>';
html += '<input id="uniquePartNum" type="text" value=' + newGUID + '>';
html += '</input>';
html += '</div>';
return html;  
}
}

//registers call back functions from SharePoint
function RegisterCallBacks(formCtx) {
                //This is what happens when the user clicks save\submit
                formCtx.registerGetValueCallback(formCtx.fieldName, function () {
                                //get the choosen value from the select element
                                var e = document.getElementById("uniquePartNum");
                                return  e.value;
                });
}

// Generate GUID
function guid() {
  function s4() {
    return Math.floor((1 + Math.random()) * 0x10000)
      .toString(16)
      .substring(1);
  }
  return s4() + s4() + '-' + s4() + '-' + s4() + '-' +
    s4() + '-' + s4() + s4() + s4();
}

The second step is to open SharePoint Designer and go to your SiteAssets library, drop PartNum.js there.

The third step is to configure the document item edit form to use this script. Go to your document library and from your library settings ribbon choose ‘Form Web Parts > Default Edit Form’. Edit the webpart. Then add the script to the JS Link field.


Now if you save the changes, you will see the “Part Number” field will be automatically populated with GUID. You could modify the script to generate the string based on your business requirement.

Since Microsoft have changed the development direction for SharePoint 2013 and 2016, you should always think about SharePoint add-in approach instead of server side solution. There are more samples from Microsoft you could refer here.

Friday, October 2, 2015

Debug SharePoint JavaScript issue with web services

If you are using JavaScript calling web services on SharePoint site,  you might see web pages as “Loading…” without the results. The following site has three ContentQuery webpart and all displayed as “Loading…”.


The quick way to debug this is to use Chrome and click More Tools -> Developer Tools. Click console and you might be able to find out the “500” exception as below.


Another quick way to what exactly is the issue, you could call the web service like http://spsbx08/sites/DocCenter/_vti_bin/client.svc in this case to see the real error.

Memory gates checking failed because the free memory (214859776 bytes) is less than 5% of total memory. As a result, the service will not be available for incoming requests. To resolve this, either reduce the load on the machine or adjust the value of minFreeMemoryPercentageToActivateService on the serviceHostingEnvironment config element.

In this case, the issue is the search services are taking too much memory on the server. We could restrict the service not to take too much memory or bounce the server as short term solution. 

Friday, September 25, 2015

How to resolve issue SharePoint OOTB 2010 approval workflow does not create tasks for everyone when large AD list used for the approvals

We have one SharePoint 2013 list that has an out of box SharePoint 2010  approval workflow running. The workflow has an AD group as approval. The AD group has 66 users across five different AD domains. The workflow was running fine for years until recently. Now it did not create all tasks for 66 everyone. Instead it only created 62 tasks and four tasks were missing. In addition, here are some other interesting findings. 
  • If we add all 66 users individually to the workflow approval field, all tasks created for everyone
  • If we separate the large AD group to three AD groups evenly, and add the three AD groups to the workflow approval field, all tasks created for everyone
  • We have different larger AD group with 300 people and it create all 300 tasks for everyone
  • Many workflows with different large AD group as approval have similar issues
  • Some users do not have proper display names but have userID as display name
  • We have another group with 105 users and it only create 102 tasks as in the following screenshot


There three different exceptions in ULS logs for workflows.


1. The first one is transaction timeout.
“Error in persisting workflow: System.Transactions.TransactionAbortedException: The transaction has aborted. ---> System.TimeoutException: Transaction Timeout     -
-- End of inner exception stack trace ---   
 at System.Transactions.TransactionStateAborted.CreateAbortingClone(InternalTransaction tx)   
 at System.Transactions.DependentTransaction..ctor(IsolationLevel isoLevel, InternalTransaction internalTransaction, Boolean blocking)   
 at System.Transactions.Transaction.DependentClone(DependentCloneOption cloneOption)   
 at System.Transactions.TransactionScope.SetCurrent(Transaction newCurrent)   
 at System.Transactions.TransactionScope..ctor(TransactionScopeOption scopeOption)   
 at Microsoft.SharePoint.Workflow.SPWinOePersistenceService.Commit(Transaction transaction, ICollection items)”


2. The second is group cannot be found.
SharePoint Foundation General 8vid Verbose Could not initialize group data from https://sharepointdev.mycompany.com/mydepart/Finance/SalesCert: Microsoft.SharePoint.SPException: Group cannot be found. c7a11c9d-0430-e0c9-8fa7-25092a0dc879

3. The third one is some users is treated as window account not claims.
SharePoint Foundation Security ahluw Verbose Entering: GetByLoginNoThrow(user1@qca.mycompany.com) c7a11c9d-0430-e0c9-8fa7-25092a0dc879
SharePoint Foundation Security ahluz Verbose Exiting: GetByLoginNoThrow(user1@qca.mycompany.com) c7a11c9d-0430-e0c9-8fa7-25092a0dc879

Based on the three exceptions, we tried to increase the workflow time out and the SharePoint timeout, however, the issue was not resolved. We also tried to create same workflow in different SharePoint farm, different web application, different site, with different AD groups, different number of users in the AD group, and different Domain controller. The workflow failed inconsistently.  

Finally we suspect there might be a issue to get ALL the users from the group during the workflow execution. We had seen SharePoint people picker performance issue before on SharePoint 2007. As a result, we set the SharePoint people picker AD search property to help the AD query. The syntax is as below. 

stsadm -o setproperty -pn peoplepicker-searchadforests -pv "forest:corp.mycompany.com;domain:na. mycompany.com;domain:ap. mycompany.com;domain:sa. mycompany.com;domain:mea. mycompany.com;domain:eu. mycompany.com" -url https://webapp.mycompany.com

You could verify the configuration using the following command.
stsadm -o getproperty -pn peoplepicker-searchadforests –url https://webapp.mycompany.com

After this configuration, all the workflows are able to create all tasks for every approval! 


Thursday, September 24, 2015

Access excel workbook content through excel REST API on SharePoint 2013

The Excel Services REST API is a new feature of Excel Services that enables you to access Microsoft Excel workbook data by using a uniform resource locator (URL) address. Using the REST API, you can retrieve resources such as ranges, charts, tables, and PivotTables from workbooks stored on SharePoint Server 2013.

The REST API provides a flexible way to use Excel data. In addition to directly linking to Excel resources using the REST API, you can also make basic HTTP calls programmatically to use Excel data within external programs. In the REST API, code is portable. There are no assemblies to distribute, no additional references are required in your project, and you do not have another object model to learn. As long as you understand the URL convention for accessing resources, you only have to build the URL and then call it with a standard HttpWebRequest object. As a result you could use REST API though HTTP, you could call it through any program like PHP, Perl, Java, C#, and javascript.

In this blog, I’ll use a simple C# console application example to use the Excel Services REST API return all data on the PivotTable. It demonstrates a basic pattern for retrieving resources from an Excel workbook on SharePoint Server 2013 using the REST API. The code will use the user name and password to authenticate to SharePoint. The code example retrieves a PivotTable named " ProjectData" from a workbook named "QMET - Project Data.xlsx" that is stored in a Reports library named "Reports" in a ProjectBICenter.

The key to using the REST API is in understanding how to construct the correct URL to a resource. A REST URL in Excel Services consists of three required parts and one optional part.
  • The first part is the location of the ExcelRest.aspx page. ExcelRest.aspx is the entry point to the Excel Services REST API.
  • The second part is the workbook location relative to the ExcelRest.aspx page.
  • The third part is the path of the requested resource inside the workbook. As an example for the excel book named "QMET - Project Data.xlsx".
  • The forth part is the format you would like to return. The valid formats are html, atom, and json.

This is example of the the REST URL to get PivotTable data as json format.
https://webapp.mycompany.com/projectsite/ProjectBICenter/_vti_bin/ExcelRest.aspx/Sample%20Reports/QMET%20-%20Project%20Data.xlsx/Model/PivotTables('ProjectData')?$format=json

You could directly use the browser to test the URL listed above with different formats and validate the data. Then the following C# code you could use as example to port to other different languages.

using System;
using System.Net.Http;
using System.IO;
using System.Net;

namespace RestExcelClient
{
    class Program
    {
        static void Main(string[] args)
        {
            // REST to get all data from PivotTable named ProjectData
            string jsonRequest = "https://webapp.mycompany.com/projectsite/ProjectBICenter/_vti_bin/ExcelRest.aspx/Sample%20Reports/QMET%20-%20Project%20Data.xlsx/Model/PivotTables('ProjectData')?$format=json";

            // Set up HttpWebRequest call to use local user name and password
            CredentialCache credCache = new CredentialCache();

           // If run on window, you could use the login user account – uncomment the below line
           //credCache.Add(new Uri(jsonRequest), "NTLM", CredentialCache.DefaultNetworkCredentials);

            credCache.Add(new Uri(jsonRequest), "NTLM", new NetworkCredential("username", "passeord", "domain.mycompany.com"));
            HttpWebRequest spRequest = (HttpWebRequest)HttpWebRequest.Create(jsonRequest);
            spRequest.Credentials = credCache;
            spRequest.UserAgent = "Mozilla/4.0+(compatible;+MSIE+5.01;+Windows+NT+5.0";
            spRequest.Method = "GET";
            spRequest.Accept = "application/json;odata=verbose";
            HttpWebResponse endpointResponse = (HttpWebResponse)spRequest.GetResponse();

            try
            {
                // Get HttpWebResponse with Json data as string
                Stream webStream = endpointResponse.GetResponseStream();
                StreamReader responseReader = new StreamReader(webStream);
                string response = responseReader.ReadToEnd();

                Console.WriteLine(response);

                // Next task is to parse the json string result
                //DataContractJsonSerializer jsonSerializer = new DataContractJsonSerializer(typeof(Response));
                //object objResponse = jsonSerializer.ReadObject(response.GetResponseStream());
                responseReader.Close();

            }
            catch (Exception e)
            {
                Console.Out.WriteLine(e.Message);
            }      

        }


    }

}


There are several key configurations we would need to point out here.  
  1. Add the Excel Services Application Trusted Data Connection Libraries
  2. Add Excel Services Application Trusted File Locations 
  3. Make sure the security token app user has access  to the external data
  4. Enable the "Data refresh from REST enabled." for the Excel Services Application Trusted File as described in this blog

You might need to parse the result json data as described here. You could use the handy online json viewer to view the json returns.

Tuesday, September 22, 2015

SharePoint online lits item created by process using Azure AD token does not trigger out of box approval workflow

We have identified one issue when creating the SharePoint list item using Azure AD token. It does not trigger the out of box approval workflow!

You could reproduce this easily by creating an console application using Azure AD token. The console client example I’m using the code copied from Richard diZerega.

Here are the steps to reproduce. 
  • Create a custom list
  • Add approval workflow to the list
  • Add item manually and verify it will trigger approval workflow
  • Create an item to the same list using Azure AD  app token does no trigger approval workflow

The following error in the logs when debugging with Microsoft.
Declarative workflows cannot automatically start if the triggering action was performed by an App-Only request. Canceling workflow auto-start. List Id: adaa6f76-bcd4-4fb7-8047-79345de1a362, Item Id: 12, Workflow Association Id: 03c8887c-d816-4a31-9181-71de9ed10523

This seems to be happening as SharePoint is considering the workflow as running under System Account. You might recall we need to run powershell to enable declarative workflow.

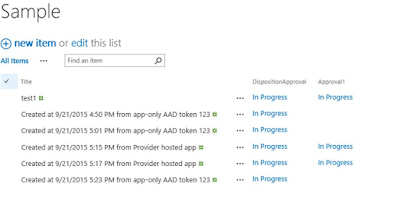
One interesting finding is the item created by same REST by using end user name and password described in different blog will trigger approval workflow. If you are using Azure AD token to authenticate to O365, the item created will be created by Azure app instead of the real user as in the following screenshot.

Another interesting finding is item created using Azure AD token will trigger other workflows like Three State workflow and Disposition workflow. 

The third interesting finding is the workflow starts fine for a provider hosted app for approval workflow. You will see some workflows failed in the below screenshot.

After working with Microsoft O365 team on this strange behavior and it turns out this is as designed. This is to prevent ADA attack. The error from the log is listed below.

SPWorkflowAutoStartEventReceiver: ItemAdded event received for list adaa6f76-bcd4-4fb7-8047-79345de1a362, item id 12
Declarative workflows cannot automatically start if the triggering action was performed by an App-Only request. Canceling workflow auto-start. List Id: adaa6f76-bcd4-4fb7-8047-79345de1a362, Item Id: 12, Workflow Association Id: 03c8887c-d816-4a31-9181-71de9ed10523
Correlation ID = f192309d-d049-2000-0a07-38a8143f17b7


If you really need to trigger workflow by using Azure AD token to create items, the workaround is to create a designer 2013 workflow. I've created a designer 2013 workflow and it was successfully triggered as in the below screenshot. The designer workflow named "Approval2013WF" has only one send email action.


Please note the item added event will be triggered and you could add business logic in the remote event receiver to perform some actions. You might not be able to sue the same token to modify the SharePoint objects.

Monday, September 14, 2015

Authenticate to Office 365 and SharePoint Online option #3 - REST using Azure AD from C#

When working on SharePoint Online as a new developer, there is always some confusion how to connect and authenticate to the SharePoint site. I’ve summarized two ACL options based implementation in previous blogs. Both implementations are using users’ O365 use name and password to communicate with SharePoint online.


The limitation of ACS approach is you are using end user’s credential that is configured to have limited access to restricted systems. It would be difficult leveraging multiple services secured by Azure AD for some use case like background bulk process. This blog will demonstrate the C# code to leverage Azure AD making app-only calls into SharePoint Online. This provides a more secure way of performing background operations against Office 365 services. In this blog you would need to have a certificate deployed to Azure AD application for the authenticate, I’ll have a different approach in future blog to leverage Azure AD without using certificate.

In order to leverage Azure AD to connect to SharePoint Online, you could need to create a Azure AD application. You could follow the steps Richard diZerega’s blog on the details. I’m using the procedure I’m using in the session “Application registration in Azure AD” from Office 365 Management APIs starting guide.


Here is the code sample to use the Azure AD application that is based on RicharddiZerega’s blog. 

using Microsoft.IdentityModel.Clients.ActiveDirectory;
using Newtonsoft.Json;
using System;
using System.Net.Http;
using System.Net.Http.Headers;
using System.Security.Cryptography.X509Certificates;
using System.Threading.Tasks;

namespace RESTAzureToken
{
    class Program
    {
        private static string CLIENT_ID = "xxxxxxxx-xxxx-xxxx-xxxx-xxxxxxxxxxxx";   // Azure AD application client ID. It should be a ~35 character string
        private static string PRIVATE_KEY_PASSWORD = "MyCertPassword";  // I’ll have different example in the future to eliminate the password
        static void Main(string[] args)
        {
            doStuffInOffice365().Wait();
        }

        private async static Task doStuffInOffice365()
        {
            //set the authentication context
            string authority = "https://login.windows.net/mycompany.onmicrosoft.com/";
            AuthenticationContext authenticationContext = new AuthenticationContext(authority, false);

            //read the certificate private key from the executing location
            var certPath = System.Reflection.Assembly.GetExecutingAssembly().Location;
            certPath = certPath.Substring(0, certPath.LastIndexOf('\\')) + "\\QCMAPICert.pfx"; // The Cert you uploaded to Azure AD application
            var certfile = System.IO.File.OpenRead(certPath);
            var certificateBytes = new byte[certfile.Length];
            certfile.Read(certificateBytes, 0, (int)certfile.Length);
            var cert = new X509Certificate2(
                certificateBytes,
                PRIVATE_KEY_PASSWORD,
                X509KeyStorageFlags.Exportable |
                X509KeyStorageFlags.MachineKeySet |
                X509KeyStorageFlags.PersistKeySet);
            ClientAssertionCertificate cac = new ClientAssertionCertificate(CLIENT_ID, cert);

            //get the access token to SharePoint using the ClientAssertionCertificate
            Console.WriteLine("Getting app-only access token to SharePoint Online");
            var authenticationResult = await authenticationContext.AcquireTokenAsync("https:// mycompany.sharepoint.com/", cac); // Do not use the site "https:// mycompany.sharepoint.com/sites/MyTestSite"
            var token = authenticationResult.AccessToken;
            Console.WriteLine("App-only access token retreived");

            //perform a post using the app-only access token to add SharePoint list item in Attendee list
            HttpClient client = new HttpClient();
            client.DefaultRequestHeaders.Add("Authorization", "Bearer " + token);
            client.DefaultRequestHeaders.Add("Accept", "application/json;odata=verbose");

            const string siteURL = "https://mycompany.sharepoint.com/sites/MyTestSite";

            // Get list from title
            const string listAction = siteURL + "/_api/web/lists/getbytitle('TestList')";
            HttpResponseMessage listResult = await client.GetAsync(listAction).ConfigureAwait(false);
            listResult.EnsureSuccessStatusCode();
            string listJsonData = await listResult.Content.ReadAsStringAsync();
            Console.WriteLine(listJsonData);

            // Get all items from list
            const string itemAction = siteURL + "/_api/web/lists/getbytitle('TestList')/items";
            HttpResponseMessage response1 = await client.GetAsync(itemAction).ConfigureAwait(false);
            response1.EnsureSuccessStatusCode();
            string itemJsonData = await response1.Content.ReadAsStringAsync();
            Console.WriteLine(itemJsonData);

        }
    }
}

The result of the items isin json format and here is the screenshot of the data from json viewer.


If you are new to O365 development, you should be aware of the following configurations in order to avoid some common errors.

1. Do not use the user friendly Microsoft new O365 URL like “mycompany.sharepoint.com”. Use the https://login.windows.net/mycompany.onmicrosoft.com/ as authority string. Otherwise you will get the error below.

Tracing:TraceError: "9/2/2015 11:57:02 PM: 542878bc-c518-4339-be97-41fe5f6ed523 - <RunAsync>d__0: Microsoft.IdentityModel.Clients.ActiveDirectory.AdalServiceException: AADSTS90002: No service namespace named mycompany.sharepoint.com' was found in the data store.
Trace ID: ca2c8bba-655a-4b01-89b3-23367373c274
Correlation ID: 542878bc-c518-4339-be97-41fe5f6ed523
Timestamp: 2015-09-02 23:57:01Z ---> System.Net.WebException: The remote server returned an error: (400) Bad Request.

2. Use the O365 tennant entry point URL instead of the site to acquire token.
var authenticationResult = await authenticationContext.AcquireTokenAsync("https://qualcomm.sharepoint.com/", cac);

If you pass the site URL 'https://mycompany.sharepoint.com/sites/SPDEV/', you will get the error below.

Exception:Caught: "AADSTS50001: Resource 'https://mycompany.sharepoint.com/sites/SPDEV/' is not registered for the account.
Trace ID: 702ef6fd-c156-4d6c-99b6-f5bb18eae6c8
Correlation ID: 0b25a990-c74c-4244-934a-90d138f66b40
Timestamp: 2015-09-02 16:41:16Z" (Microsoft.IdentityModel.Clients.ActiveDirectory.AdalServiceException)
A Microsoft.IdentityModel.Clients.ActiveDirectory.AdalServiceException was caught: "AADSTS50001: Resource 'https://qualcomm.sharepoint.com/sites/SPDEV/' is not registered for the account.
Trace ID: 702ef6fd-c156-4d6c-99b6-f5bb18eae6c8
Correlation ID: 0b25a990-c74c-4244-934a-90d138f66b40
Timestamp: 2015-09-02 16:41:16Z"
Time: 9/2/2015 9:41:16 AM
Thread:Worker Thread[10072]

3. When you are generating the X.509 certificate, make sure the key length is at least 2048. Shorter key lengths are not accepted as valid keys.

4. Manifest cannot not be re-uploaded unless you set variable $base64Value to null. If you change the certs, I'm not sure how to replace it to the exiating Azure AD application. There might be a powershell to do that but I've not find it.

5. The following packages you would need to ad to the references.
  • Active Directory Application Library
  • Json.NET package
  • System.Net.Http package

6. Be aware of the O365 MFA configuration and you might need to run this app inside your company firewall as I explained in previous blog.

Friday, September 11, 2015

Authenticate to Office 365 and SharePoint Online option #2 - REST using SharePointOnlineCredentials object from C#

When working on SharePoint Online as a new developer, there is always some confusion how to connect and authenticate to the SharePoint site. I’m summarizing all the different authenticate ways so my developers could choice one appropriate approach for their projects.


In this blog, I’ll illustrate the C# REST example using SharePointOnlineCredentials object. In this case, you need to pass the user name, password, and the REST end point. The following example illustrated the REST API to get list from title and get all items from one list.


using System;
using System.Net.Http;
using System.Net.Http.Headers;
using System.Security;
using System.Threading.Tasks;
using Microsoft.SharePoint.Client;
using Newtonsoft.Json.Linq;

namespace RESTClient
{
    class Program
    {
        static void Main(string[] args)
        {
            const string siteURL = "https://mycompany.sharepoint.com/sites/SPDEV";
            const string actionREST = siteURL + "/_api/web/lists/getbytitle('TestList')";
            const string userName = "userID@mycompany.com";
            const string password = "mypassword";

            // Get the list jason result
            Task<string> result = getRestResult(siteURL, actionREST, userName, password);
            result.Wait();
            string jasonResult = result.Result;
            Console.WriteLine(jasonResult);

            // Get list Title from jason result
            var obj = JObject.Parse(jasonResult);
            var title = (string)obj.SelectToken("Title");
            Console.WriteLine(title);

            // Get all items jason result
            const string actionRESTItem = siteURL + "/_api/web/lists/getbytitle('TestList')/items";
            Task<string> resultItems = getRestResult(siteURL, actionRESTItem, userName, password);
            resultItems.Wait();
            string jasonItemResult = resultItems.Result;
            Console.WriteLine(jasonItemResult);

            // Get each item from jason result


        }

        private static async Task<string> getRestResult(string siteURL, string actionREST, string userName, string password)
        {

            //Creating SharePointOnlineCredentials 
            var securePW = new SecureString();
            foreach (var c in password) securePW.AppendChar(c);
            var credential = new SharePointOnlineCredentials(userName, securePW);

            //Creating Handler to allows the client to use SharePointOnlineCredentials
            using (var handler = new HttpClientHandler() { Credentials = credential })
            {
                //Getting authentication cookies 
                Uri uri = new Uri(siteURL);
                handler.CookieContainer.SetCookies(uri, credential.GetAuthenticationCookie(uri));

                //Invoking REST API 
                using (var client = new HttpClient(handler))
                {
                    client.DefaultRequestHeaders.Accept.Clear();
                    client.DefaultRequestHeaders.Accept.Add(new MediaTypeWithQualityHeaderValue("application/json"));

                    HttpResponseMessage response = await client.GetAsync(actionREST).ConfigureAwait(false);
                    response.EnsureSuccessStatusCode();

                    string jsonData = await response.Content.ReadAsStringAsync();
                    return jsonData;
                }
            }
        }


    }
}

The nest step is to parse the jason return string to get each item details. We will provide examples in the future.

Thursday, September 10, 2015

How to resolve error “Microsoft.SharePoint.Client.IdcrlException: The sign-in name or password does not match one in the Microsoft account system” when using CSOM for O365/SharePoint online

One of the easiest way to communicate to O365 and SharePoint Online is through CSOM code as we described in previous blog. The code is extremely easy however some people run into the following common error.

Unhandled Exception: Microsoft.SharePoint.Client.IdcrlException: The sign-in name or password does not match one in the Microsoft account system.
   at Microsoft.SharePoint.Client.Idcrl.IdcrlAuth.GetServiceToken(String securityXml, String serviceTarget, String servicePolicy)
   at Microsoft.SharePoint.Client.Idcrl.IdcrlAuth.GetServiceToken(String username, String password, String serviceTarget, String servicePolicy)
   at Microsoft.SharePoint.Client.Idcrl.SharePointOnlineAuthenticationProvider.GetAuthenticationCookie(Uri url, String username, SecureString password, Boolean alwaysThrowOnFailure, EventHandler`1 exe
cutingWebRequest)
   at Microsoft.SharePoint.Client.SharePointOnlineCredentials.GetAuthenticationCookie(Uri url, Boolean refresh, Boolean alwaysThrowOnFailure)
   at Microsoft.SharePoint.Client.ClientRuntimeContext.SetupRequestCredential(ClientRuntimeContext context, HttpWebRequest request)
   at Microsoft.SharePoint.Client.SPWebRequestExecutor.GetRequestStream()
   at Microsoft.SharePoint.Client.ClientContext.GetFormDigestInfoPrivate()
   at Microsoft.SharePoint.Client.ClientContext.EnsureFormDigest()
   at Microsoft.SharePoint.Client.ClientContext.ExecuteQuery()
   at CSOM.Example.Program.Main(String[] args)


This error may be inconsistent and you might have this issue when you are not on the corporate network like people reported here. After debugging this issue, there are several common areas you could check to resolve this quickly.

1. Verify whether the user name and password directly from O365 UI. If this account has been disabled or changed, you could verify immediately.

2. Verify whether you have MFA enabled if using ADFS for this account. Normally we enabled MFA for security reason and apply rule to be trigger if the request is coming from non-trusted source like non company network. This might be the #1 reason why the same code is working when the machine is on the corporate network and exception when undock the machine. You could refer Microsoft instruction to disable the account is the code need to be run off the corporate network.

3. Verify you have latest SharePoint client dlls. SharePoint client libraries may change based on different releases. You might need to upgrade the client library and here is the latest version.

4. Loopback  enabled is common issue for WFC web service and you might need to disable it. Disabled the loopback check entirely by creating REG_DWORD DisableLoopbackCheck at HKEY_LOCAL_MACHINE\SYSTEM\CurrentControlSet\Control\Lsa and setting value to Decimal 1.

This is the list of the most common configurations that might cause CSOM to communicate with O365/SharePoint online. The rest of the coding is straightforward.


Wednesday, September 9, 2015

Authenticate to Office 365 and SharePoint Online option #1 - CSOM using SharePointOnlineCredentials object from C#


When working on SharePoint Online as a new developer, there is always some confusion how to connect and authenticate to the SharePoint site. I’m summarizing all the different authenticate ways so my developers could choice one appropriate approach for their projects.
 
In this blog, I’ll illustrate the CSOM C# example using SharePointOnlineCredentials object. In this case, you need to pass the user name and password. You need to add Microsoft.SharePoint.Client.dll and Microsoft.SharePoint.Client.Runtime.dll references.


using System;
using System.Security;
using Microsoft.SharePoint.Client;
 

namespace CSOM.Example
{
    class Program
    {

        static void Main(string[] args)
        { 

            // Site URL, user name, and password

            string webUrl = "https://mycompany.sharepoint.com/sites/SPDEV";

            string userName = "user@myconpony.com";

            string password = "password";
 

            // Convert the string passowrd to SecureString

            SecureString securePassword = new SecureString();

            foreach (char c in password)

            {

                securePassword.AppendChar(c);

            } 


            using (var context = new ClientContext(webUrl))

            {

                context.Credentials = new SharePointOnlineCredentials(userName, securePassword);

                context.Load(context.Web, w => w.Title);

                context.ExecuteQuery();


                Console.WriteLine("Your site title is: " + context.Web.Title); 

                var list = context.Web.Lists.GetByTitle("TestList");

                context.Load(list);

                context.ExecuteQuery();

                Console.WriteLine("Your list title is: " + list.Title);

                CamlQuery query = CamlQuery.CreateAllItemsQuery(100);

                ListItemCollection items = list.GetItems(query); 

                context.Load(items);

                context.ExecuteQuery();

                foreach (ListItem listItem in items)

                {

                    // We have all the list item data. For example, Title.

                    Console.WriteLine("Your item title is: " + listItem["Title"]);

                }

            }

        } 

    }

}