Showing posts with label SharePoint Apps. Show all posts

Wednesday, July 17, 2019

Ultimate procedures to configure "Calendar E-mail Extension for Office 365" apps for SharePoint online


Calendar E-mail Extension for Office 365 sends invitations, handles responses and allows Exchange resources to be booked from a SharePoint calendar, making organizing your calendar as simple and efficient as possible. Here is the summary of the features.

  • Send meeting requests from SharePoint calendars. Now it's possible to invite attendees directly from a SharePoint Online calendar.
  • Book Exchange rooms and equipment. You can book rooms and equipment in Exchange directly from a SharePoint Online calendar.
  • View status replies and attendance status. The SharePoint Online Calendar displays every attendee’s invite status, including their acceptance status, tentative acceptances or any new time suggested.
  • Check availability of attendees and resources. You can check resources' and attendees' availability when scheduling an event directly from a SharePoint Online calendar.

One of the key feature we are looking for is to check the availability of the Exchange rooms and equipment. There are few tricks to make this work in SharePoint online. Here are the details to configured this correctly.


1. The first step is to add "Calendar E-mail Extension for Office 365" to SharePoint online site collection.

You could "Add an app" from the SharePoint online site collection. Here is the app you should add.


2. The second step is to enable the conflict checking scripting on the site collection. This has to be done before you configure the calendar! Otherwise you have to update each existing calendar and save it to pick up the conflict checking script! 

The two steps are:
a. Enable the custom scripts on the site. The SharePoint Online Management  Powershell script is like this below.

# Change this URL to match your admin site
Connect-SPOService -Url https://<yourdomain>-admin.sharepoint.com
# Enter username and password
# Change this URL to match your SharePoint site
Set-SPOSite -Identity https://<yourdomain>.sharepoint.com/sites/yoursite -DenyAddAndCustomizePages $false

b. Update Calendar E-mail Extension for Office 365 app permission. 

  • Open the SharePoint online site where the add-in is installed and navigate to http://<SharePointWebsite>/_layouts/15/AppInv.aspx.
  • Enter the following App Id (d4f43231-f66d-4f82-93b1-bd5a9d9945c1) and click on Lookup.
  • In the Permission Request XML box, enter the following xml:

      <AppPermissionRequests AllowAppOnlyPolicy="true" >
        <AppPermissionRequest Scope="http://sharepoint/content/sitecollection/web"       
         Right="FullControl" />
      </AppPermissionRequests>
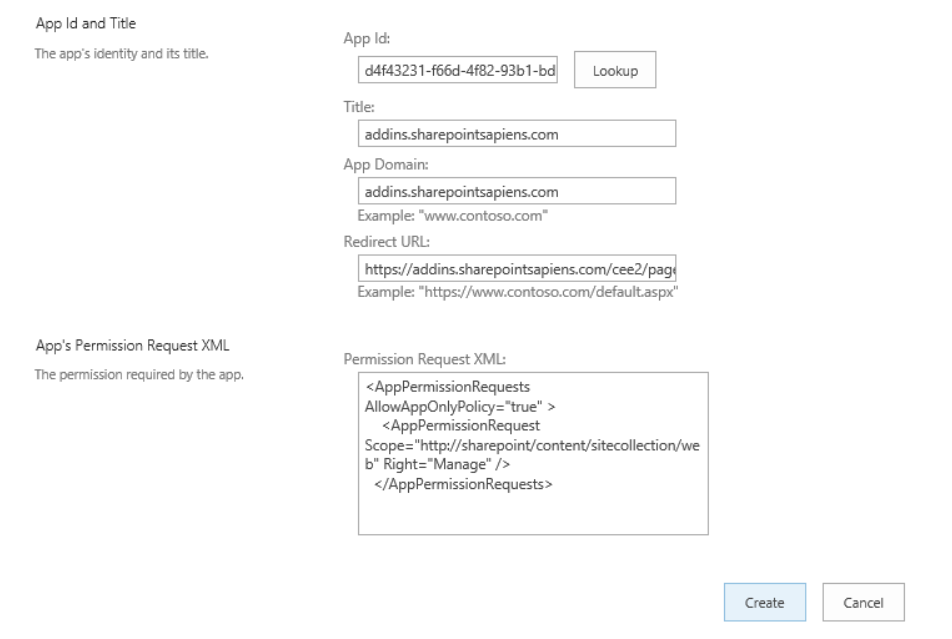
  • Click on Trust it.
  • Click on the Calendar E-Mail Extension for Office 365 add-in in the site contents page
  • Click on Configure on each calendar list where the add-in is configured and save the settings again.

The details is listed in vendor's documentation here.

3. The third step is to add calendar and configure the resources.
Click Settings->Site contents->"Calendar E-mail Extension for Office 365", this will bring to configuration page like below.

After add a new calendar, click "Configuration" of the calendar. Enter the account or the shared mailbox account. The enter password to verify.


The you could configure the "Attendees" and "Resources". Please note you might need to add additional room and equipment mailbox for your application as in the below screenshot. Please select "Check Availability".


Then you would need to click save.

4. The forth step is to hide some fields users may not need to simplify the forms.

You could change the room to one of the following three options. This depends on your business requirement
  • Drop-Down Menu
  • Radio Buttons
  • Checkboxes (allow multiple selection)

The procedure is to click "List Settings"->Click "Event (with email extension) Content Types->"Exchange Rooms and Equipment"-> Click "Edit column". Then select one of the three options.


If you need to hide some files from users, please refer to my previous blog for details.


5. The fifth step you might need to do is to disable users to save booking when there is a conflict.

The default behavior after you configure to check availability of the resource, when you try to save the booking, it will prompt the dialog box when there is a conflict.


You will noticed that there are two buttons "Don't save" and "Save Anyway" that do not make sense to allow users to save if there is conflict. 

Well, there is a way to remove these two buttons and here are the details. There are three places you need to make the change. The URLs are listed below for list named "PCP Booking 2".

Go to "Settings" -> "Edit the page" and find the "SharePoint|sapiens Calendar E-Mail Extension Client Script" webpart->Click "EDIT SNIPPET".


Then append the following script to hide two buttons. Click "Insert" and save the page.

      <style type="text/css">
      input[value='Save Anyway'] { display: none; }
      input[value="Don't save"]  { display: none; }
      input[value="Don't save"] + input[value='Save'] { display: none; }

      </style>


5. The sixth optional step you might want to do prevent users to create past event.You could configure this in the lsit Validation setting.

Click the list settings->Validation settings. Enter the following formula to prevent past event to be created.

=[End Time]>Created


You could use another formula to prevent the past event to be modified.

=[End Time]>Now() 

5. The seventh optional step you might want to allow user to edit their events created by themselves.

You can go into the List Settings, Advanced Settings, and you should be able to set Read and Edit access to items that the user has created.


Now the  "Calendar E-mail Extension for Office 365" apps is ready on the SharePoint online site.


Friday, December 2, 2016

Auditing solutions deployed to SharePoint environments

With increasing SharePoint 2013 customizations with new app model, there are incidents that these customizations are not working correctly in production while they are working on non-production environments. As SharePoint architect, I’m working with the team to come up an deployment auditing process to ensure what we deployed is what we should deployed. This auditing process will reports the details of the customization components especially the version labels that has been beneficial for deployment verification and debugging. Here are some the auditing reports that have helped to eliminated any customization environment discrepancies.

1. Audit app deployed to certain site collection and the app details including the versions. Here is the powershell commands.

param([string]$siteUrl)

$snapin = Get-PSSnapin | Where-Object {$_.Name -eq 'Microsoft.SharePoint.Powershell'}
    if ($snapin -eq $null) {
      Add-PsSnapin Microsoft.SharePoint.PowerShell -ErrorAction SilentlyContinue
}

############################################################################################################################################
function ListApps([string] $siteUrl, [string]$reportName)
{
        $appInstances = Get-SPappinstance -web $siteUrl

        if($appInstances -ne $null)
        { 
                foreach ($eachAppInstance in $appInstances)
                {        
                    $title = $eachAppInstance.Title
                    $version = $eachAppInstance.App.VersionString
                    $AppPrincipalId = $eachAppInstance.AppPrincipalId
                    $Id = $eachAppInstance.Id

                    Write-Output "$title; $version; $Id; $AppPrincipalId"| Out-File $reportName -append 
    
                }
        }


}

############################################################################################################################################

ListApps https://sharepoint.mycompany.com/sites/criticalsite E:\Applist.txt


The result is like below and you could comapre the result across different environments. There are references you could use for different app API.


2. Audit any customized dlls and the versions. Here are some powershell commands.

This one will list ALL dlls inside the current directory recursively.

Get-ChildItem -Filter *.dll -Recurse | Select-Object -ExpandProperty VersionInfo


This one will list only the named dll.

Get-ChildItem -Filter *.dll -Recurse | Where-Object {$_.name -Match "mycompany.com.sp.application1.common.dll"} | Select-Object -ExpandProperty VersionInfo 


3. Audit all farm solutions and their status. Here are the powershell commands.

Add-PSSnapin Microsoft.SharePoint.PowerShell -ErrorAction SilentlyContinue

# Get all Solutions deployed
Get-spsolution | select * |out-file c:\solution.txt

# Connect to the Farm
$SPfarm = [Microsoft.SharePoint.Administration.SPFarm]::get_Local()

# What Solution are we looking for?
$solution = "mycompany.com.sp.apps.workflows.wsp";

# Get the solutions
$currentSolution = $SPfarm.get_Solutions() | Where-Object { $_.DisplayName -eq $solution; }
$currentSolution; 


We are adding other auditing such as features, permission, configurations at this time and will share those in the future.

Friday, June 19, 2015

Step by step to deploy Provider-Hosted app to Microsoft Azure used for SharePoint Online site


There are several examples to deploy Provider-Hosted app to Microsoft Azure for SharePoint Online. I started to follow the example by Microsoft and it worked pretty well. However, there is simply way to achieve the same goal and I would like to provide the steps for new developers in my team.  Please note this example is an empty apps that will not integrate with any Azure or O365 API. The goal is to allow developers to follow easily without too much features. SharePoint apps utilize Azure SSO and O365 APIs will be different and I’ll provide a different deployment procedure in the future.

This example will include the following major steps.

  1. Create a Provider-Hosted app
  2. Create a Microsoft Azure web 
  3. Register the app in Office 365
  4. Publish the remote web to Microsoft Azure
  5. Publish an app to SharePoint Online
  6. Add a SharePoint app to a site
Step 1 - Create a Provider-Hosted app

1. Launch Visual Studio 2013 as administrator
2. In Visual Studio select File/New/Project
3. In the New Project dialog:
      a. Select Templates/Visual C#/Office/SharePoint/Apps
      b. Click App for SharePoint 2013
      c. Name the new project SPAzureApp and click OK


4. In the New App for SharePoint wizard:

      a. Enter the address of a SharePoint site to use for testing the app (NOTE: The targeted site must  
          be based on a Developer Site template)
      b. Select Provider-Hosted as the hosting model.
      c. Click Next.


     d. Select ASP.NET MVC Web Application.
     e. Click Next.

     f. Select the option labeled Use Microsoft Azure Access Control Service (for SharePoint cloud 
         apps).
     g. Click Finish.

     h. When prompted, log in using your Office 365 administrator credentials.
     i. Press F5 to begin debugging.
     j. When prompted, log in using your Office 365 administrator credentials.
     k. When prompted, click Trust it.
     l. Verify that the app home page shows and that it properly welcomes you by name.

You now have a new working Provider-Hosted app project.

Step 2 - Create a Microsoft Azure Web

1. Log into the Azure Management Portal as an administrator.
2. Click Web Sites.
3. Click New.
4. Enter the web app name like SPAzureWeb
5. Click Quick Create

You will have the Azure web running now.

Step 3 - Register the app in Office 365

1. Log into the Office 365 developer site as an administrator
2. From the developer site, navigate to /_layouts/15/appregnew.aspx.
3. Click Generate next to Client ID.
4. Click Generate next to Client Secret.
5. Enter SP Azure App as the Title.
6. Enter the App Domain for the Azure web site you created earlier (e.g., 
    spazureweb.azurewebsites.net)
7. Enter the Redirect URI as the reference for the Customers page (e.g. 
    https://spazureweb.azurewebsites.net).
8. Click Create.
9. Save the Client ID and Client Secret separately for later use.


Step 4 - Publish the remote web to Microsoft Azure
1. Log into the Azure Management Portal as an administrator.
2. Double click Web Sites you created like SPAZureWeb
3. Click Download the publish profile under Publish your app
4. Remember the file location like C:\Users\harryc\Downloads\SPAzureWeb.azurewebsites.net
5. In Visual Studio 2013 the SPAzureApp solution, right click SPAzureApp
6. Click Publish...

7. Click New and select the file from previous Step 4.4

8. Click Next
9. Enter the Client ID and Client Secret from Step 3

10. Click Finish
11. Click Deploy your web project

12. Click Publish

13. You should see the publish success mesage
2>Adding ACL's for path (SPAzureWeb)
2>Publish Succeeded.
2>Web App was published successfully http://spazureweb.azurewebsites.net/
========== Build: 1 succeeded, 0 failed, 0 up-to-date, 0 skipped ==========
========== Publish: 1 succeeded, 0 failed, 0 skipped ==========

Now the web app has been published to Azure.

Step 5 - Publish an app to SharePoint Online

1. Right click the SPAzureApp project and select Publish.
2. Click Package the App.
3. Change the URL used as entry point to https instead of default http

4. Click Finish.
5. Now remember the location of the app file named SPAzureApp.app

The following steps are optional and only necessary if you want the app to be published to app catalog so all site could use it.
6. Return to the Office 365 tenant and select Admin/SharePoint.
7. Click Apps/App Catalog.
 
8.  Select Create new app catalog site if you do not have created already
9.  Click OK.
10. Fill out the required information for the new app catalog site and click OK.
11. Once created, navigate to the new app catalog site.
12 In the app catalog site, click Apps for SharePoint.
13. Click New.
14. Browse to the app package you created earlier.
15. Add the app package to the Apps for SharePoint library.

Step 6 - Add a SharePoint app to a site

Option #1 - If you have already added the app to the app catalog 
1. Navigate to a site in your Office 365 tenancy.
2. Click Site Contents. (NOTE: If you are using the Developer site, it may have an older version of the app still installed from testing. You must remove the app from the site AND remove the entry from the  Apps in Testing  list or the new app will not install.)
3. Click Add an App.
4. Click From Your Organization.
5. Click the app installer.
6. When prompted, click Trust It.
7. Use the tile to launch the app.

Option #2 - If you have not already added the app to the app catalog and like to add the app directly to the site
1. Login to the site and click Apps in Testing
2. Click new app to deploy
3. Click upload

4. Identify the app file generated from Step 5.5

5. Click Deploy
6. When prompted, click Trust It.

Now you can click the App title to lunch the App.

This will be the complete steps to deploy a simple Provider-Hosted app to Microsoft Azure used for SharePoint Online site. We will continue to explain the deployment of Provider-Hosted app utilizing Azure AD and O365 API later.