Thursday, September 3, 2015

Procedure to debug and fix error "This page can't be displayed" for provider-hosted SharePoint Add-ins

If you create an OoB provider-hosted SharePoint Add-in and run from Visual Studio, you should be able to see the default web page with “Welcome <your name>” on it.

However, we are getting the following error “This page can't be displayed” on all our development 2012 servers.


After extensive debugging, we have found a workaround for this issue and here are the steps to debug and fix it.

1. Verify TLS and SSL for browser are enabled as shown below for IE.


2. Verify the web app is inside IIS entry. The IIS configuration should be in this location C:\Users\harryc\Documents\IISExpress\config\applicationhost.xml. Check whether you have the application you developed in the configuration like below. 

 <site name="SharePointApp4Web" id="22">
                <application path="/" applicationPool="Clr4IntegratedAppPool">
                    <virtualDirectory path="/" physicalPath="C:\Projects\SharePoint2013\O365\DEV2013\SharePointApp4\SharePointApp4Web" />
                </application>
                <bindings>
                    <binding protocol="http" bindingInformation="*:44119:localhost" />
                    <binding protocol="https" bindingInformation="*:44304:localhost" />
                </bindings>
</site>


3. Verify Window system have any error as below.

In my case, the errors are:
A fatal error occurred when attempting to access the SSL server credential private key. The error code returned from the cryptographic module is 0x8009030D. The internal error state is 10001.

An error occurred while using SSL configuration for endpoint 0.0.0.0:44304.  The error status code is contained within the returned data.

4. Nest step is to verify the cert for the port number (44304) running the web. You should look at the Certificate Hash.

Run command with the port number the web is running:

IIS Cert netsh http show sslcert ipport=0.0.0.0:44304

    IP:port                      : 0.0.0.0:44304
    Certificate Hash             : ec4d6de883f60ab764f696e6a712f6694ec86b11
    Application ID               : {214124cd-d05b-4309-9af9-9caa44b2b74a}
    Certificate Store Name       : MY
    Verify Client Certificate Revocation : Enabled
    Verify Revocation Using Cached Client Certificate Only : Disabled
    Usage Check                  : Enabled
    Revocation Freshness Time    : 0
    URL Retrieval Timeout        : 0
    Ctl Identifier               : (null)
    Ctl Store Name               : (null)
    DS Mapper Usage              : Disabled
    Negotiate Client Certificate : Disabled

You can get the Certificate Hash and Application ID from above command. 

5. Verify cert on IIS directly.

You could also verify the certs to run the below command.

mmc.exe-File->Add/Remove Snapin..->Add Certificates->Select Computer account->Local Computer-OK.


Identify the certs the express 8 is using and right click Open->Details. Found the Thumprint value. This should match the value from netsh command line.

In my case, I'm getting following error "No keys found certificate!". You will understand why the provided-hosted app does not work. There is bad certificate.


We are not sure why the Visual Studio installation did not install/generate correct certificates for IIE 8 express. We are still working with Microsoft to isolate the root cause. The workaround is to change the certificate IIS Express runs against for a specific ip/port by manually deleting and re-adding the bindings via the command-line.

Here are the steps for your reference.

1. Create a self-signed certificate (i.e. “IISExpressTest”) on the server and make note of the Thumbprint value.
                Open IIS manager
                Click “Create Self-Signed Certificate…”
                Enter the name like IISExpressTest and keep Personal as store
                Right the Cert and click View
                View the details and copy the Thumbprint value like 
                    5cb2a108b853f372103294f74a12ddab0c549e6a for future step

2. From the command line do: 
netsh http show sslcert ipport=0.0.0.0:44304

    IP:port                      : 0.0.0.0:44304
    Certificate Hash             : ec4d6de883f60ab764f696e6a712f6694ec86b11
    Application ID               : {214124cd-d05b-4309-9af9-9caa44b2b74a}
    Certificate Store Name       : MY
    Verify Client Certificate Revocation : Enabled
    Verify Revocation Using Cached Client Certificate Only : Disabled
    Usage Check                  : Enabled
    Revocation Freshness Time    : 0
    URL Retrieval Timeout        : 0
    Ctl Identifier               : (null)
    Ctl Store Name               : (null)
    DS Mapper Usage              : Disabled
    Negotiate Client Certificate : Disabled
Record the Application ID for future step.

3. Determine what port a specific IIS Express site uses.  In my case, it was using 44304, so https://localhost:44304 was my site.

4. From the command line, delete the current cert.
netsh http delete sslcert ipport=0.0.0.0:44304

5. From the command line, bind the new cert.
netsh http add sslcert ipport=0.0.0.0:44304 appId={214124cd-d05b-4309-9af9-9caa44b2b74a} certhash=‎5cb2a108b853f372103294f74a12ddab0c549e6a

The port number is the port for your web running by IIS
The appId is the value you got from step #2
The certhash is the value from step #1

6. Verify https://localhost: 44304 will bring up the new certificate “IISExpressTest”.

Run the web again and you could verify the issue should be fixed and you can click the certs and view details that matches the Thumbprint value.

This workaround needs to be run for any web created and I’m thinking to add this to the Visual Studio prebuild scrip to automate the step.

Wednesday, September 2, 2015

Migrating NuGet Package Manager enabled solutions to use Automatic Package Restore

Recently I was involved to evaluate one new O365 function and there is one client Visual Project passed to me. I really want to compile this project so I can debug through the code but there are two major issues.

1. When we compile this solution, it give the following error message.
This project references NuGet package(s) that are missing on this computer. Enable NuGet Package Restore to download them.  For more information, see http://go.microsoft.com/fwlink/?LinkID=322105.

2. When we try to Manage Nuget package, we got the following error.
"Operation failed. Unable to locate solution directory. Please ensure that the solution has been saved."

After researching the issue, we found this project was NuGet Package Manager enabled solutions and we would better to migrate to NuGet Automatic Package Restore as recommended. Here is the complete procedure to rebuild the project.

1. Remove following NuGet dependencies from the project file named yourprojectname.csproj as described here. Save the project file and then you could reopen it from Visual Studio. This will resolve issue #1.

<RestorePackages>true</RestorePackages>
...
<Import Project="$(SolutionDir)\.nuget\nuget.targets" />
...

<Target Name="EnsureNuGetPackageBuildImports" BeforeTargets="PrepareForBuild"> <PropertyGroup> <ErrorText>This project references NuGet package(s) that are missing on this computer. Enable NuGet Package Restore to download them. For more information, see http://go.microsoft.com/fwlink/?LinkID=322105. The missing file is {0}.</ErrorText> </PropertyGroup> <Error Condition="!Exists('$(SolutionDir)\.nuget\NuGet.targets')" Text="$([System.String]::Format('$(ErrorText)', '$(SolutionDir)\.nuget\NuGet.targets'))" /> </Target>

2. Click save the project. This will resolve issue #2.

3. Right click solution and click Enable NuGet Automatic Package Restore. This will migrate to use Automatic Package Restore to avoid future NuGet package issue.

4. Right click References for the project and click Manage Nuget package. Search package required for the project such as "Active Directory Application Library". Install the package.

Now you will a project that can be compiled for debugging.

Monday, August 31, 2015

Asset Library or Video Portal for O365 videos?

Video is one of the most powerful mediums of communication. Office 365 Video provides organizations with a secure, company-wide destination for posting, sharing and discovering video content. From onboarding new employees, to distributing a CEO message company wide, to community contributions, video is now a first-class citizen to power and enrich your internal communications.
With a beautiful user interface and intuitive content management options, Office 365 Video is designed to meet the requirements of IT and win the hearts and minds of users. Powered by Azure Media Services—the same service used during the Olympics (6,000 plus hours of video in 18 days)—Office 365 Video benefits from adaptive smooth streaming technology optimizing video playback for the device it’s being viewed on. It, too, leverages Yammer and the Office Graph to deliver a social, personalized experience within Office 365. 
Recently we have a customer who requested to build a O365 site to manage the videos. My first impression is to host the videos on O365 Video Portal. However, the application requires that end users would be able to download the videos. The O365 Video Portal does not provide this “simple” function and we have to evaluate O365 Asset Library for Videos. Both approaches have pros and cons and could not be used for certain situation. I’m think to summarize here for future reference.
The pros of O365 Video Portal: 
  • Simplicity
  • Discoverability and share’ability with search and Office Delve
  • Social integration with Yammer
  • mobile ready
  • built-in security and easy to manage
  • Embed feature and share feature


The cons of O365 Video Portal:
  • No download link for video
  • Not easy to integrate with workflows to manage videos 

The pros of O365 Asset Library for Videos:
  • Discoverability with search
  • Simplicity to integrate with SharePoint other features like workflow and retention policy
  • Built-in security and easy to manage
  • Embed feature and share feature
  • Download feature
  • Flexibility to use different thumbnail 


The cons of O365 Asset Library for Videos:
  • No default thumbnail and you need to create a one
  • Not as easy as video to integrate with Office Delve
  • Not sure it’s leverage the Azure Media Services
Now it's clear you have to use O365 Asset Library for Videos if you need to provide the video download functions. We have provided the feedback to Microsoft and hope this function would be provided in the near future.

Thursday, August 13, 2015

Major issues for SharePoint-Exchange photo sync

As Microsoft suggested, we could leverage the high-resolution photos available in Exchange 2013 through SharePoint-Exchange photo sync feature. However, after we evaluated the architecture and implementation, we identified several major issues that you should serious consider before moving to production.

Here is the architecture and process explain by Jens from Microsoft.

SharePoint Server 2013 maintains a library of User Photos, just like in SharePoint Server 2010. When SharePoint-Exchange photo sync is enabled, SharePoint's local photo store becomes a cache, and SharePoint Server 2013 treats Exchange 2013 as the master photo store. SharePoint-Exchange photo sync is not a regular sync job that runs on a recurring cycle. Instead, SharePoint Server 2013 requests photos from Exchange 2013 automatically when a user performs an operation that causes a request for their own photo (for example, browsing to their own user profile page). That means that the user needs to have requested his/her own photo, before other users will be able to see it.


When a user with a valid Exchange 2013 mailbox attempts to change their profile photo, SharePoint Server 2013 will launch the Outlook 2013 Web App photo upload dialog.


Here are the main issues from this architecture and implementation.

1. Users need to have a mysite in order to sync the pictures from exchange. This is not valid for some companies. In our case, we have over 31,000 employees and around 10,000 of them have mysite. Most of the VPs and CEO will not have mysite. In another word, there will be significant number of missing pictures by this approach.

2. During picture load, a user has to perform an operation that causes a request for their own photo (for example, browsing to their own user profile page). That means that the user needs to have requested his/her own photo, before other users will be able to see it.

3. During picture update, since SharePoint-Exchange photo sync is not a regular sync job that runs on a recurring cycle,  users' picture will not be updated until users request it by browsing the mysite as described in issue #2.


4. There is also issue some users could not get pictures even browsing the mysite. we are working with Microsoft but have not find the solution.

These are some additional you can implement to workaround these issues. However, the cost and maintainability might lead us to a different approach that we had  implemented on SharePoint 2007. The approach is to write a program in either Powershell or C# to pull
high-resolution photos available in external system directly to SharePoint.

If you have any better solution, please share.

Wednesday, August 5, 2015

How to get Tenant ID for the O365 tenant?


When we start the Office 365 Management APIs preview program, it requires us to send the Tenant ID for the O365 so it could be enabled. Depends on whether you are O365 adminstrator, developer, site owner, or end user, there are different options for your reference.


1. Use O365 Powershell list below to query tenant information. You could refer other blog to retrieve details for your tenant. This is useful for O365 administrator.

Get-MsolPartnerContract -DomainName <domainname.onmicrosoft.com> | Select-Object -TenantId


2. Use Azure Powershell to list tenant ID. You could refer this blog.

Add-AzureAccount


Get-AzureSubscription -Current


3. Use O365 site to retrieve Tenant ID. This is useful for O365 site owners and end users.

Navigate to your Site Settings then "Site App Permissions" and inside there will be listed an App Identifier that will include you Tenant ID. Here you can see the Tenant ID is listed for each app. Everything after the "@" sign will be your tenant ID.


4. Use web service URL to retrieve Tenant ID. useful for O365 site owners and end users.

You can download the Postman and enter the following URL as GET action.

https://<tenant>.sharepoint.com/sites/<sitename>/_vti_bin/client.svc

Add the following as Header:
Authorization Bearer

You will see the Tenant ID in the response body as shown in the screenshot below.


5. Use Azure AD portal retrieve Tenant ID. This is useful for O365 administrator and O365 developers.

Login to the Azure AD Portal, drill down and click “ACTIVE DIRECTORY” and click the name of the company. Copy the ID from the URL.

https://manage.windowsazure.com/teamtelstra.onmicrosoft.com#Workspaces/ActiveDirectoryExtension/Directory/<Tenant ID>/directoryQuickStart

Thursday, July 9, 2015

SharePoint list designer workflow constantly failed to set item title to the item name with "Unknown error"


Recently we have increasing SharePoint list designer workflow failed on many different SharePoint 2013 sites. Although most of the SharePoint list designer workflow are very simple that only includes 2010 workflow activities, we have noticed "Unknown error" is the most common error for failed workflows.


In the effort to identify the root cause of the issue, we are able to reproduce the error from one SharePoint list designer workflow. This SharePoint list designer workflow is simple and will update the item title with the name when new item added or modified as in the screenshot.


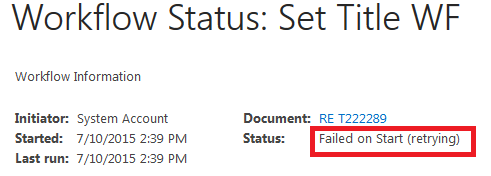
We have email enabled for this list and use email to send email to the list to create item. After emailing several items to the list, you will be able to find some workflows error out. This is constant across several different SharePoint environments. The workflow could be in either "Error Occurred" or "Failed on Start (retrying)".


We have some other SharePoint list designer workflow issues we might need to address later. Please note if the email does not trigger workflow on the list, you might need to verify server setting

DeclarativeWorkflowAutoStartOnEmailEnabled.
 
$spWebService = [Microsoft.SharePoint.Administration.SPWebService]::ContentService $spWebService.DeclarativeWorkflowAutoStartOnEmailEnabled

If it is False, please enable it with the PowerShell command below and then check the results:
$spWebService = [Microsoft.SharePoint.Administration.SPWebService]::ContentService $spWebService.DeclarativeWorkflowAutoStartOnEmailEnabled = $true $spWebService.Update()


After debugging with Microsoft, we found if we add 1 to 5 minutes pause as first activity of the workflow, we are able to complete these workflows. We had to cleanup many failed workflows and make system clean.