There
are many articles
you might refer to configure your SharePoint
2013 farm for apps development and two of them are extremely useful.
One from Microsoft named Configure an environment for apps for SharePoint(SharePoint 2013) gives you the detailed procedure and the other from Ahmed Farag that listed some of the detailed procedure to debug apps development. Although
both articles described all the details to configure SharePoint
2013 farm for apps development, they both require to purchase domain names and
configure DNS server that most developers may not have access. In this article, we’ll focus on SharePoint hosted apps and
provide a procedure that you could shortcut the process to jump start SharePoint
hosted apps development on your development box without DNS server or purchased
domain.
In order to make your
SharePoint 2013 farm ready to develop and deploy apps without DNS server or new domain creation, you need the following steps:
- Turn on\create required services and service applications
- Create app store web app and site collection
- Configure app domain, app prefix, and host file entries
- Prepare your tools\environment
1. The first step is that you should start both App Management and Microsoft SharePoint Foundation Subscription Settings service from
central admin since apps rely on the both these two service applications. These
service applications use the multi-tenancy features to provide app permissions
and create the subdomains for apps. Therefore, even if you are not hosting
multiple tenants, you must still establish a name for the default tenant for
your environment (any SharePoint site that is not associated with a tenant will
be in the default tenant).
Then you need to create App Management Service
Application from central admin and Subscription settings service
Application using the following powershell script. You could use similar
powershell to create App Management Service Application.
# Gets the name of the
managed account and sets it to the variable $account for later use
$account = Get-SPManagedAccount "domain\farmaccount"
# Create an application
pool for the Subscription Settings service application.
# Use a managed account
as the security account for the application pool.
# Store the application
pool as a variable for later use.
$appPoolSubSvc =
New-SPServiceApplicationPool -Name SettingsServiceAppPool
-Account $account
# Create the
Subscription Settings service application, using the
# variable to associate
it with the application pool that was created earlier.
# Store the new service
application as a variable for later use.
$appSubSvc =
New-SPSubscriptionSettingsServiceApplication –ApplicationPool $appPoolSubSvc
–Name SettingsServiceApp
–DatabaseName "SubscriptionServiceAppDB"
# Create a proxy for the
Subscription Settings service application.
$proxySubSvc =
New-SPSubscriptionSettingsServiceApplicationProxy
–ServiceApplication $appSubSvc
2. The second step is to create app store web app, host site collection, and configure host
file records. This is critical workaround step if you do not have access to DNS configuration or domain creation.
You could use central admin to create new web application on existing web app (Example is default 80 port) as long as the web app host
header is blank for the existing web app. In our example, we create a new IIS web app named "intranet" on existing port 80 web app and add Host Header as "intranet.com". The Host Header will be critical for App store web app as in the following screen shot.
Next you create a root site collection based on "Developer Site" template inside the new web app as in the following screen shot.
Please note you need to create the site collection under root, otherwise, you will get "sharepoint 2013 app 'RegisterSod' is undefined" error when you develop apps later.
3. The third step is to configure app domain, app prefix, and host file entries.
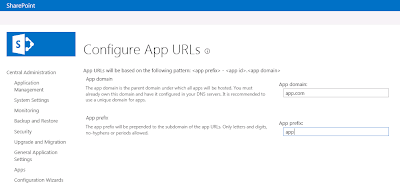
From central administration, you could click Apps->Configure App URLs and then enter the following information that is similar to the blog.
App domain = app.com
App prefix= app
Then you need to open hosts file under C:\Windows\System32\drivers\etc and enter the two entries. Please replace xxx.0.0.1 with the correct local host IP address.
xxx.0.0.1 app.com
xxx.0.0.1 intranet.com
4. The last step is to prepare your tools\environment. You can use Visual Studio 2012 to create a SharePoint 2013 SharePoint-hosted app project. As Ahmed Farag mentioned in his blog, you should NOT use farm admin to deploy the App project. You should enable the Developer Site features on the hosted site collection.
After you start the App project, you will see two entries automatically added into hosts file. The xxx.0.0.1 is the server IP address and each app is prefixed with app.
xxx.0.0.1 app-f75ce1e9bc1ac8.app.com # 12d81e7c-02ca-4d68-a32d-2621b0c7e4be;http://sandbox1/
::1 app-f75ce1e9bc1ac8.app.com # 12d81e7c-02ca-4d68-a32d-2621b0c7e4be;http://sandbox1/
You will noticed the app is deployed and displayed as in the following screen shot.
You could verify the App installed using the powershell command "Get-SPAppInstance -web http://sandbox" against the default webapp you deploy the app to display the app.
Up to this point, you should have everything you need to develop and debug SharePoint app even without DNS or new domain creation.


.NET development, ASP development, SharePoint development,SharePoint 2013 development
ReplyDeleteMicrosoft development , software development, Singapore – Total eBiz Solutions Home
I am very impressed with your blog you did a very hard job. and I appreciate that sharing a helpful post, great job!
ReplyDeleteCado Magenge
" website development company melbourne | custom web development company
iphone application development melbourne | mobile app development company"
Thanks for sharing such amazing & informative post here. I really liked it very much.
ReplyDeleteI also like to suggest you the best custom software development company in Singapore, You can go with Genic Solutions for inventory management software. Get in touch ASAP to get the best quotes.
Thanks
ReplyDeleteThanks for writing this blog, You may also like the Software Delivery Management , Delivery Yourself
Your prose is very compelling and compelling. Continue the excellent work! Please read this profile about Chromebook Autoclicker. It includes all the necessary information. For repetitive chores like filling out forms or clicking links, the Chromebook Auto Clicker is ideal.
ReplyDelete